
A year or so ago I posted an article on the importance of arriving–getting the ball up to or past the hole when you hit a shot into the green. That was all based on theory, with a generous assist from the writings of Vivien Saunders.
Now I have some actual data. Yesterday I was prowling around the Internet (why is that word capitalized, anyway?) looking for data on the average leave for recreational golfers’ shots into the green because I was writing about the interplay of swing improvement and short game and putting improvement. What I found forced me take a U-turn and revisit arriving.
The image below is a chart of the dispersion of the AMA (average male amateur) from 160 yards away. What I don’t know is whether the dots represent shots hit only by male golfers who are of average skill, or if the dots show the average compiled by male amateurs regardless of skill. That difference probably isn’t relevant to the point I’m making in this piece, though.

I divided the chart into a sixteen-cell grid. Four columns separate shots that missed left, hit the green left, hit the green right, and missed right. Four rows separate shots the missed long, hit the green long of center, hit the green short of center, and missed short.
Because the green is round and not square, there are a few shots in the corners of the four grid cells for hitting the green that did not hit the green, but I accounted for those.
An eyeball inspection shows two things: most of the shots that missed the green missed short, and most of the shots that missed short were on line to hit the green.
Here are the actual numbers, which I got by counting the dots:
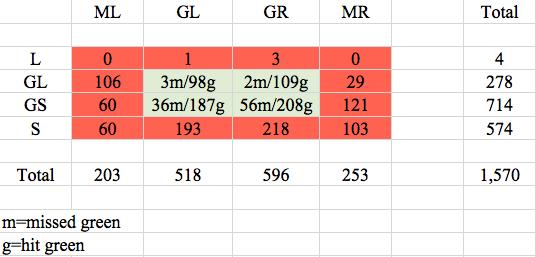
I won’t make your eyes glaze over by throwing bunch of numbers at you. You can make whatever you want to out of what’s in the table. I will say just two things with numbers that I already said with words.
(1) Eight out of ten of the shots in the chart finished short of the center of the green (GS+S). That means that only two out of ten shots into the green finished beyond the center of the green.
(2) Of the 574 shots that finished short of the green (S), seven out of ten of them (411) would have hit the green if they had been hit far enough: S: GL+GR.
What does that mean? Four out of ten of all shots hit the green (green cells). If you push the shots in the (S: GL+GR) cells into the GS row, now over six out of ten shots will have hit the green: (S: GL+GR) + (GS: GL+GR). The actual percentages here are 38% and 64%.
If you apply these percentages to every hole (which doesn’t match reality, but this is all the data we have) you get 6.8 and 11.5 GIR, respectively. THAT’S ALMOST FIVE MORE GIR JUST BY HITTING ENOUGH CLUB INTO THE GREEN.
And that is just getting the ball onto the green, never mind getting the ball onto the green past the hole.
Maybe some of the shots at the green that ended up short were mishits. Well, not maybe. Were. But that’s only a small portion of them, and not enough to take away from the following point.
The average male amateur (that’s you) can GREATLY increase the number of greens he/she (you) hits JUST BY USING ENOUGH CLUB.
Why doesn’t that happen? Either you don’t really know how far away the green/pin is, or you don’t really know how far you hit your irons, or do know but base club selection on how far you are capable of hitting that club rather than how far you usually hit that club. Or you don’t take your lie into count. Or the wind. Or the condition of the turf. Or how you’re hitting today. Or the green is elevated.
All of those are easy problems to solve. They do not require you to be one bit better of a ball-striker than you are now. They just require you to think.
Maybe you won’t get five more GIR. Maybe four, maybe three. But you’ll get more.
I’m not going to listen to any excuses.

