Category Archives: putting

What I Learned at the Range – 3/24/22

Good day at the range. I used to be very good with a driver, but a few years away from the game was enough for me to forget how to swing it. Or any golf club, for that matter.

I had developed an arms-oriented swing, but it was too much arms. I had forgotten about the lower body, so I added in the hips and knees. Still no good.

You can get away with stuff with irons, but not with the driver. Somehow today, I realized that I had forgotten about my torso on the forward swing. It’s part of the sequence and I had left it out.

The hips turn, the torso turns, the arms swing, in that order. Instant success! Nice, straight fairway-finders. They fly a bit low, though, so I’ll get a lesson to help me with that.

Then there’s putting. When I watch the close-ups on TV of the touring players taking the putter back, it goes back as if it is on a rail. Perfectly straight back. Mine wobbles a bit, and I for the life of me couldn’t figure out how not to have that happen.

And today, for some reason, I gripped down on the handle so I was holding it in the middle, not near to the top. Instant success!

I was now holding the putter at its balance point and it started back with no wobble.

When I go to the range, I leave myself open to figuring out new things. I do that by never taking anything for granted. There is another way to do anything, and if you try it, that might be a better way.

To finish my day at the range, I always hit a few approach putts using my TAP method. It’s scary how well that works.

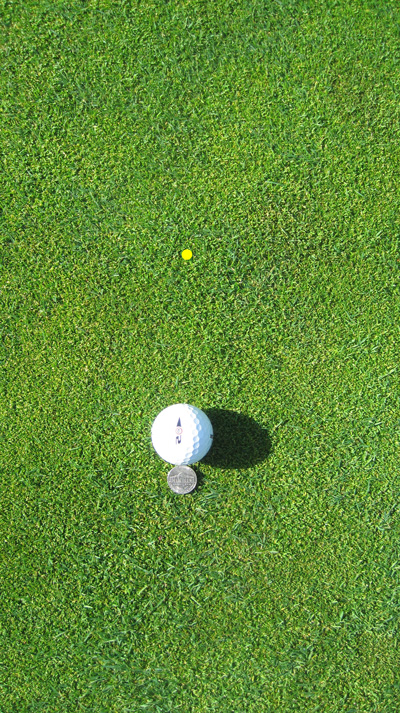
The right way to align your ball on the green

Most professional golfers that I see on television have drawn a line on the ball which they use to align the ball on the green. The golf balls I use already have an arrow printed on it for this purpose. I haven’t checked, but I would suppose lots of other modern balls do, too.

The act of aligning the ball can be a problem, though. The usual procedure is to squat down, try to eye-ball the starting line of the putt, and align the mark on the ball to it.

I see everybody looking at something at or near the hole, which can be a long way off. That, to my mind, seriously calls into question the accuracy of the alignment.

There must be a better way.

It’s a problem and only I can fix it.

You might have heard of spot putting. You pick a spot a few inches in front of the ball on the starting line and roll your putt over that spot. The idea is if you make that three-inch putt, you’ll make the eight-foot putt.

So-o-o, why not take it easy for yourself and set your ball down so it points to that spot three inches in front of the ball instead of something any number of feet away? Three inches is close enough that you can get it exactly right.

(I Photoshopped the yellow dot to make the visual clearer.)

If you trust the spot you have found, you have to trust aligning your ball this way.

Not only do you get a better alignment, you can do this in a matter of seconds. People in your group won’t have to watch you go tweak…tweak…tweak…, for bleeding ever.

You’re welcome!

How I Practice Putting At Home

When I practice putting at home, I usually practice just my stroke. I don’t try to hit the ball at a target. I save that for the practice green at the range.

I’ll putt to a backstop about six feet away, trying to emulate this stroke, because there is so much that is good about it. See it at 0:30.

I concentrate on two things:

1. A gentle swing of the club back and through, keeping the clubhead low going back and going through, swinging the entire club, not just the clubhead. A putt, too, is a swing, not a hit.

2. Contacting the ball on the sweet spot, which I tell by sound. I want to make the right sound every time.

How To Miss a One-Foot Putt

If you have never missed a one-foot putt, you don’t need to read this post. The other 99% of my readers need to pay attention. And I don’t exclude myself.

One-foot putts are so easy. We don’t really have to go through our routine. Just step up the ball in any old way, give the ball a knock and it’s in the hole.

Except sometimes it doesn’t go in the hole and you think, “You’ve got to be kidding!” Or maybe that is a polite way of expressing what you are thinking.

It didn’t go in the hole because you did not give that putt its due. You got sloppy.

You approach this putt differently from every other putt you hit because you don’t think you have to be as careful with it as all the others.

And that is caused, I believe because you don’t have much experience in hitting one-foot putts, or in hitting them the right way.

Tell me. When you go to the practice green, how often do you hit one-foot putts? Or if you hit an approach putt to one foot, how often do you set up to it and hit that one-footer the same way you hit every other putt ? (Probably never.)

Here’s what I want you to do the next time you go to the range. Hit one-foot putts. A lot of them. Twenty is a lot. Set up each time like you always do. Hit the ball into the hole. Even though a putt this short is called a tap-in, you do NOT tap it in. Hit it in.

Don’t just go through the motions. Take each putt seriously. Get experience with these putts going in the hole.

Getting good at golf means getting good at as many things as you can, and taking none of it for granted.

Like one-foot putts.

How to Sink a Certain Kind of Putt

Most of the things I discover about putting come from hours spent on the practice green. Every so often something goes click. This one, however, comes from my back room, where I knock the ball around for a few minutes every night.

It’s about sinking the putts that you just have to sink–short, no break. Just straight in the hole. Yet, those can be the hardest ones, for some reason.

This is what I noticed. I had been imagining a tiny line between the ball and the hole, and hitting the putt so the ball rolls along that line. That’s a lot of pressure

But what popped into my head that night was a band, as wide as the putter, going to the hole.

Not only that, but I saw that if you line up the toe of the putter with the corresponding edge of the hole, so that if the putter could magically slide across the green to the hole, the absolute toe would graze that edge of the hole, which would square up the putterface to roll ball into my rubber “hole” dead center.

In the photo, the thin red line lines up of the toe of the putter with the outside edge of the hole, and the transparent red band is what the putterface stays square to–a much easier image to believe in that a tiny line going from the ball to the hole.

So forget about the hole, forget about the ball, just make your stroke to have the putter face stay square to the band and the ball goes in. Easy!

As for lining up the toe of the putter with the outside edge of the hole, it might seem like this would not be exact. But if you try this out, and the putterface is not square to the hole, you will see clearly that the toe is not “pointing” to the edge.

I think this works because you are squaring up the entire surface of the putterface rather than a small point on the surface. And to tell the truth, I’m not even sure you can square up a point to something.

I tried out this method on a putting green and found it to be reliable up to about 15 feet.

[Update: With practice, you can use this technique on breaking putts, too, by learning how much to line up the tip of the putterface outside (R to L) or inside (L to R) the hole.]

Distance Control On the Green

I was browsing through the blog just now and read a post from 2010 about finding the speed of a putt. That is, if it’s X feet to the hole, how hard do I hit it?

There was one comment in that post that not only gets you in the ball park, it puts you right next your seats, to extend the metaphor.

Go the practice green and learn how to hit putts of 10 feet, 20 feet, 30 feet, and 40 feet. Learn to feel the stroke that puts the ball right next to the hole from each of these distances.

Take touch, which can vary from day to day, out of the picture by making the length of your stroke your sole distance generator.

If you are between distances, say 25 feet, make a practice stroke with the 20-foot stroke, another with the 30-foot stroke, and then one in between, which you will use for the putt. You would do the same if the putt is 20 feet but uphill, or 30 feet and downhill.

The more you calibrate your golf, the easier it gets.

Hover Your Putter

I was at the range today, spending a lot of time by myself, as usual, on the practice green.

Part-way through that session, I reminded myself of something that really makes a difference in how to strike putts. That is to hover your putter above the grass before you take it away.

If you take the putter back from resting on the ground, you have to do two things: lift the putter up and then take it back. Because you are moving the putter through two directions and not one, the clubhead can end up wobbling back and forth bit as you take it back, not so much you would notice, but enough to feel like you aren’t really in control of the club.

But if the putter hovers in the air it can be taken away with a hitch, literally, so it swings back and forth in a pure swinging movement.

It also felt to me like I could make a gentler stroke and not have to work at controlling the club.

I found such a stroke rolled short putts with authority and approach putts didn’t feel like they had to be hit so hard.

Have you ever stubbed your putter on the green before it hit the ball on your through-stroke? Won’t happen if your putter is off the ground the entire way.

Give it a try, see if you like it.

The Pop Putting Stroke

Some time ago, it might have been in the early 2000s, The Golf Channel showed old All-Star Golf episodes after hours.

These were matches filmed from the late 1950s to the early 1960s featuring two Tour pros in an 18-hole stoke play competition. The winner got $2,000 and the loser $1,000. Back then that was good money and they got everybody to appear.

I taped a lot of them.

There was one match with Bob Rosburg, who was recognized as one of the best putters of his time. He had something of a pop putting stroke, and was very good at it.

Since I’m wiling to try anything, I tried it out a few years ago, had some fun with it, and forgot about it. But I came back to it recently.

My version of the stroke is to take the club back only a very short distance, two inches, and give the ball a firm rap. There isn’t much of a follow-through.

I make the stroke with my hands, but I have to be careful to make it a controlled stroke and not a quick stab or a jab.

Because the stroke is so short, all the power comes from the pop you give to the ball with the right hand (lefties, it would be your left hand). Most of your practice with this stoke is in learning how to make a smooth hit.

The major benefit of this stroke is that the backswing is so short that the face of the club never gets out of square. There’s no “swinging door” that has to get itself back to square at just the right moment. Performed correctly, the ball goes where you aimed the face, guaranteed.

The pop stroke works great in my back room on the deck carpet, and it works great on the course. The ball runs right to the hole and falls in. A lot.

I use it for makeable putts, of no more than about twelve feet, where direction is paramount. Longer than that, getting the distance right takes over so I switch to a normal sweeping stroke because it controls distance better than a quick pop.

So this is something for you to play with, something different to try. Can’t hurt, might help.